 on the workbench; or choose New Part from the Project menu and choose Data Table from the submenu.
Create a Table Using Data from Another Application
You can create tables in VIP Workshop that other ODBC-compliant applications can use. Likewise, you can also view, edit, and manipulate data in tables from ODBC-compliant database applications in VIP Workshop as long as the appropriate ODBC drivers are installed on your computer.
When creating a table using data from another ODBC-compliant database application, you connect to the data source, then select the table in that data source that you would like to view or manipulate in VIP Workshop.
By doing this, you are creating a definition from the project to the actual data file, which contains the data. That "definition" is contained in a table file (with a *.Tbl file extension) that is created when you create the table part. Every table part is associated to a table file, which contains information on where the data file is located.
Next time you open this project, the table part displays in the work area of the project window.
1In the project window, double-click on the table part on the workbench; or choose New Part from the Project menu and choose Data Table from the submenu.
A blank table appears in table view.
2Click the Data Table drawer  to open it.
3Double-click on the Table type option to select a data source.
4Click the Build button  to the right of the Table type option.
The SQL Data Sources dialog box appears.
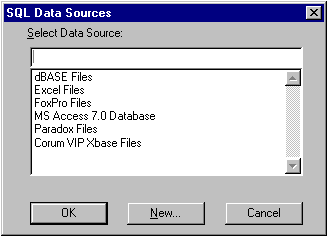
5From the list box, select the data source for the table you would like to connect to and click the OK button.
If the ODBC-compliant data source you want does not appear in the list, then either 1) you need to install its ODBC driver first, or 2) the data source you want has not been defined for a particular ODBC driver. This means that you have not determined how the ODBC driver is to read the specified data. If this is the case, click here for further instructions 
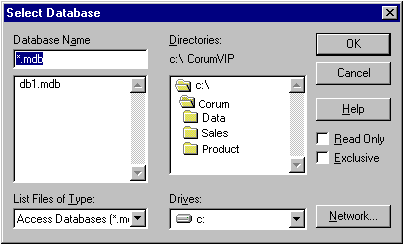
6Depending on what data source you selected in the SQL Data Sources dialog box, the Select Database dialog box may appear. If it appears, this indicates that the data source you selected requires that you specify a database file. For example, if you select MS Access 7.0 as a data source, you must select the database file (or *.mdb file) that contains the table you would like to connect to. In the Select Database dialog box, locate the database file and click the OK button. The database file appears in the Connect database edit box of the Data Table drawer.
With other data sources, such as dBASE, the database is not a file; it is the directory that contains the tables of data. If you have selected one of these data sources in the SQL Data Sources dialog box, then a path will automatically appear in the Connect database option of the Data Table drawer. Click in the Connect database edit box and edit the path as required.
For more information on the differences between data formats, see Special Note for Particular Data Formats.
7Double-click the Connect table option and select a table from the drop-down list. These are the tables that exist in the database you connected to.
8Double-click the Can write option to toggle its value from Yes to No, as desired.
This property determines whether a user will be allowed to write to the table after it’s created or not.
9Click the Continue button to close the drawer.
The table you connected to appears open and displayed in table view. If you save and close the table, you will find the table part in the work area of the project window.
10Modify the table indexes as needed. For more information, see Setting Indexes. For instructions, see Edit an Index.
11Save the table.
See also:
What is ODBC?